Quickstart Guide
Introduction
Welcome to the CNF Reference Architecture quickstart guide. This guide provides the quick guidance to run a sample containerized networking application in a Kubernetes cluster, which is comprised of AArch64 machines.
This reference solution is targeted for a networking software development or performance analysis engineer with in-depth Kubernetes and networking knowledge, but does not know AArch64 architecture necessarily.
Mastering knowledge on certain open source projects, e.g., Ansible, Kubernetes, DPDK, will help gain deeper understanding of this guide and the reference solution more easily.
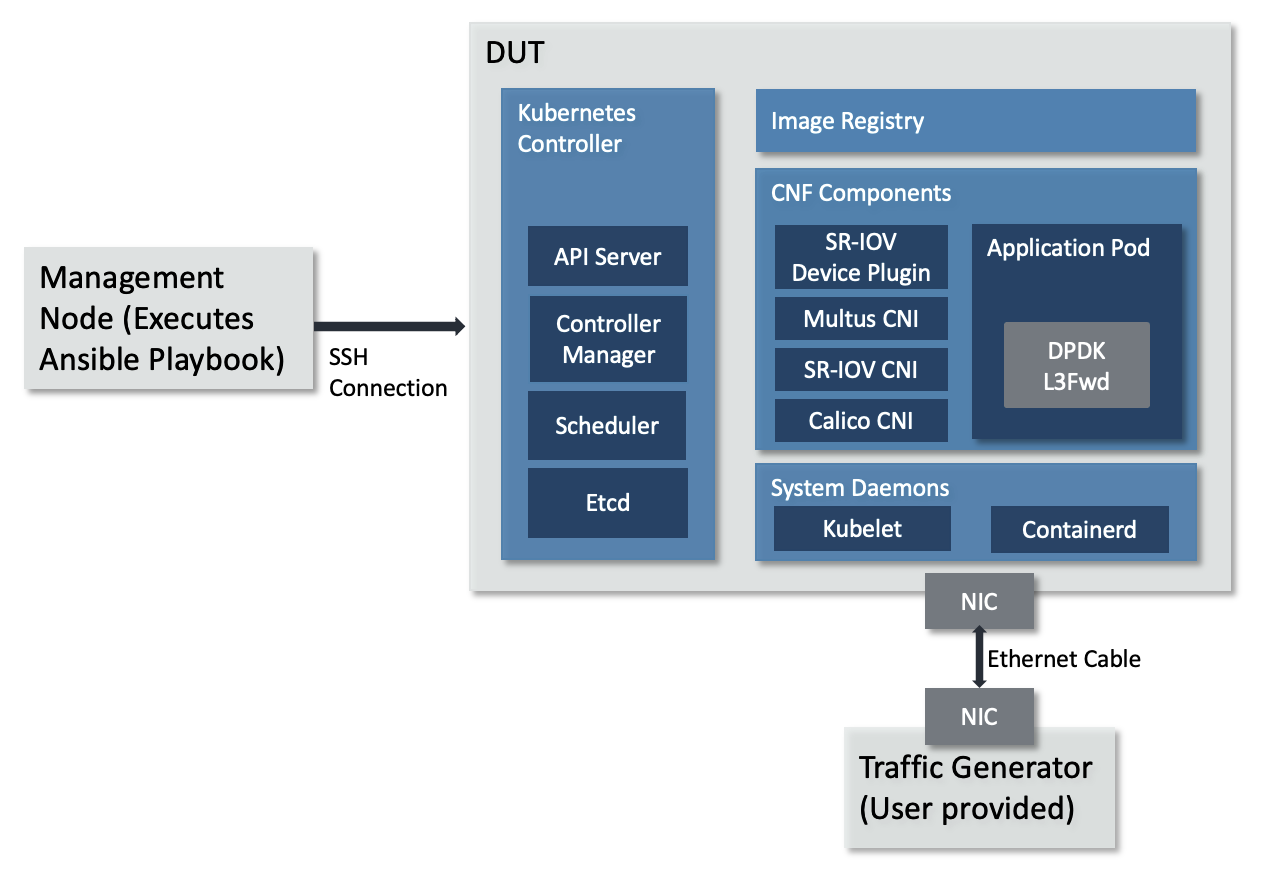
By following the steps in this quickstart guide to the end, you will set up a single-node Kubernetes cluster. Kubernetes controller and Application Pods are deployed on a single AArch64 machine. The DPDK L3 forward sample application is deployed in the Application Pod. The application receives and forwards the packets based on the destination IP address using a single port. The single-node Kubernetes cluster topology is shown as below.

Single-node Kubernetes cluster topology
The topology diagram above illustrates the major components of the deployment and their relationship.
DUT (Device Under Test), is the only AArch64 machine in single-node Kubernetes cluster. Kubernetes controller and Application Pods run on this machine.
DPDK L3 forwarding application, implements L3 networking function in software and forwards packets per their destination IP address.
TG (Traffic Generator), generates and sends packets to the AArch64 machine’s NIC card via the Ethernet cable. It can be hardware TG, e.g., IXIA chassis, or software TG running on regular server, e.g., TRex, DPDK Pktgen, Scapy.
Management Node, can be any bare-metal machine, VM, or container. It is used to download the project source code, login to the DUT to create the Kubernetes cluster and deploy the application.
Hardware Setup
This guide requires the following setup:

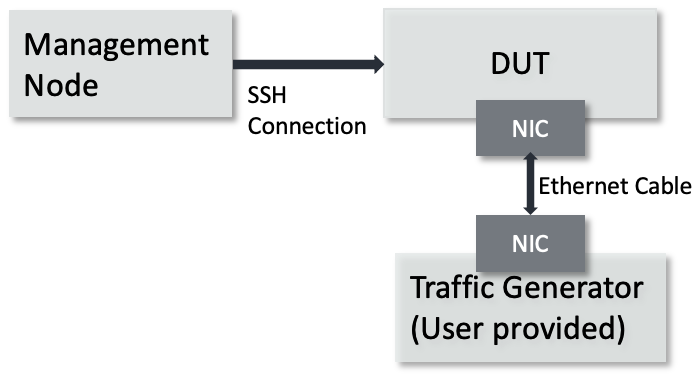
Required hardware setup
DUT is an AArch64 architecture machine and the only node in Kubernetes cluster. NIC card is plugged in its PCIe slot to connect the traffic generator via Ethernet cable.
Hardware Minimum Requirements
The DUT has the following hardware requirements:
AArch64 v8 CPU
Minimum 1GHz and 4 CPU cores
DPDK compatible NIC
Connection to the internet to download and install packages
Minimum 8G of RAM
Support 1G Hugepages
Software Minimum Requirements
The following items are expected of the DUT’s software environment.
DUT is running Ubuntu 20.04 (Focal)
Admin (root) privileges are required to setup the DUT
The Fully Qualified Domain Name (FQDN) of the DUT can be checked with
python3 -c 'import socket; print(socket.getfqdn())'command. See FAQ if the proper FQDN is not shown.PCIe address of the NIC port attached to the traffic generator is confirmed with
sudo lshw -C network -businfoCPU cores are isolated via
isolcpus, nohz_full, rcu_nocbs, cpuidle.off, cpufreq.offLinux command line parameters. See FAQ for more details.
Management node can be any bare-metal, VM, or container. The management node is used to download the repository, access the DUT via
sshand configure Kubernetes cluster by executing an Ansible playbook. The Ansible playbook is executed locally on management node and it configures the DUT viassh.
Software Minimum Requirements
Can execute Ansible
Can
sshinto the DUT using SSH keys. See FAQ for more details.Admin (root) or
sudoprivileges are required
TG can be any traffic generator capable of generating IP packets.
Tested Platforms
The steps described in this quickstart guide have been validated on the following platforms.
DUT
Ampere Altra (Neoverse-N1)
Ubuntu 20.04.3 LTS (Focal Fossa)
NIC
-
OFED driver: MLNX_OFED_LINUX-5.4-3.1.0.0
Firmware version: 16.30.1004 (MT_0000000013).
Intel X710
Firmware version: 6.01
Note
To use Mellanox NIC, install OFED driver, update and configure NIC firmware by following the guidance in FAQ.
Management Node
Ubuntu 20.04 system
Python 3.8
Ansible 6.5.0
Prerequisite
Management Node
Management node needs to install dependencies, e.g., git, curl, python3.8, pip, Ansible, repo. Follow below guidelines on Ubuntu 20.04.
Make sure
sudois available and installgit, curl, python3.8, python3-pip, python-is-python3by executing$ sudo apt-get update $ sudo apt-get install git curl python3.8 -y $ sudo apt-get install python3-pip python-is-python3 -y
Install
ansibleby executing$ sudo python3 -m pip install ansible==6.5.0
Note
Install the ansible and not the ansible-core package, as this solution makes use of community packages not included in the ansible-core python package.
Download Source Code
Unless mentioned specifically, all operations in this section are executed on management node.
Create a new folder that will be the workspace, henceforth referred to as
<nw_cra_workspace> in these instructions:
mkdir <nw_cra_workspace>
cd <nw_cra_workspace>
export NW_CRA_RELEASE=refs/tags/NW-CRA-2022.12.30
Note
Sometimes new features and additional bug fixes are made available in
the git repositories, but are not tagged yet as part of a release.
To pick up these latest changes, remove the
-b <release tag> option from the repo init command below.
However, please be aware that such untagged changes may not be formally
verified and should be considered unstable until they are tagged in an
official release.
To clone the repository, run the following commands:
repo init \
    -u https://git.gitlab.arm.com/arm-reference-solutions/arm-reference-solutions-manifest.git \
    -b ${NW_CRA_RELEASE} \
    -m cnf-reference-arch.xml
repo sync
Create Single Node Cluster
Unless mentioned specifically, all operations henceforth are executed on management node.
Create Ansible Inventory File
The Ansible playbooks in this repository are easiest to use with inventory files to keep track of the cluster nodes. For this solution we need one inventory file.
A template inventory.ini is provided at <nw_cra_workspace>/cnf-reference-arch/inventory.ini with the following contents:
[controller]
<fqdn> ansible_user=<remote_user>

[worker]
<fqdn> ansible_user=<remote_user> pcie_addr=<pcie_addr_from_lshw> dpdk_driver=<vfio-pci>
Replace <fqdn> with the FQDN of the DUT. The same FQDN should be used for both [controller] and [worker] as this is a single-node setup.
<remote_user> specifies the user name to use to login to the DUT.
Replace <pcie_addr_from_lshw> with the PCIe address of the port on the DUT connected to the traffic generator.
If the DUT uses Mellanox ConnectX-5 NIC to connect the traffic generator, replace <driver-name> with mlx5_core. Otherwise, replace it with vfio-pci.
As an example, if the user name used to access DUT is user1, the DUT FQDN is dut.arm.com and is connected to the traffic generator on PCIe address 0000:06:00.1 with a NIC compatible with the vfio-pci driver, then inventory.ini would contain:
[controller]
dut.arm.com ansible_user=user1

[worker]
dut.arm.com ansible_user=user1 pcie_addr=0000:06:00.1 dpdk_driver=vfio-pci
Execute the Playbook
To setup the Kubernetes cluster, run:
$ ansible-playbook -i inventory.ini create-cluster.yaml -K
It will start by asking for the sudo password of the user name on DUT (the prompt may say BECOME
password instead). If remote user has passwordless sudo on DUT, the -K flag can be omitted.
See the user guide for the full list of actions this playbook will take.
Validate the Cluster
At this point in time, the setup should look like the Single-node Kubernetes cluster topology at the beginning of this document. The DUT should be in a Kubernetes cluster and running a private docker registry.
To verify, ssh into the DUT and run kubectl get nodes.
The output should look like:
$ kubectl get nodes
NAME            STATUS   ROLES           AGE   VERSION
dut.arm.com     Ready    control-plane   24m   v1.24.2
Also run kubectl describe node $(hostname) | grep -A 5 ^Allocatable: to ensure allocatable CPUs and 1G hugepages are correct.
The output should look like:
$ kubectl describe node $(hostname) | grep -A 5 ^Allocatable:
Allocatable:
arm.com/dpdk:       2
cpu:                3
ephemeral-storage:  189217404206
hugepages-1Gi:      1Gi
Finally, verify the local docker registry is running with: docker ps -f name=registry. The output should look like:
$ docker ps -f name=registry
CONTAINER ID   IMAGE        COMMAND                  CREATED        STATUS          PORTS                            NAMES
53656144b298   registry:2   "/entrypoint.sh /etc…"   46 hours ago   Up 33 minutes   0.0.0.0:443->443/tcp, 5000/tcp   registry
Run the Sample Application
Run
Now, it is time to apply the dpdk-l3fwd.yaml Ansible playbook. To do so,
run the following commands:
$ cd <nw_cra_workspace>/cnf-reference-arch/examples/dpdk-l3fwd
$ ansible-playbook -i ../../inventory.ini dpdk-l3fwd.yaml
See the dpdk-l3fwd user guide for the full list of actions this playbook will take.
Once the playbook finishes, ssh into the DUT and deploy the DPDK L3
forwarding application with dpdk-deployment.yaml file which is copied and stored
in DUT home directory:
$ cd $HOME
$ kubectl apply -f dpdk-deployment.yaml
Check deployment status with command:
$ kubectl get deploy
NAME   READY   UP-TO-DATE   AVAILABLE   AGE
dpdk   1/1     1            1           74s
Test
Monitor the application pod status by running kubectl get pods on the DUT.
It may take some time to start up.
kubectl get pods should show something like:
$ kubectl get pods
NAME                   READY   STATUS    RESTARTS   AGE
dpdk-9d8474bd8-xl7kk   1/1     Running   0          6s
Once the pod is in the “Running” state,
view its logs with kubectl logs <podname>.
The logs should contain something similar to:
$ kubectl logs dpdk-9d8474bd8-xl7kk
...
Initializing port 0 ... Creating queues: nb_rxq=1 nb_txq=1...
Address:98:03:9B:71:24:2E, Destination:02:00:00:00:00:00, Allocated mbuf pool on socket 0
LPM: Adding route 198.18.0.0 / 24 (0) [0001:01:00.0]
LPM: Adding route 2001:200:: / 64 (0) [0001:01:00.0]
txq=2,0,0
These logs show port 0 has MAC address 98:03:9B:71:24:2E with PCIe address
0001:01:00.0 on the DUT. 1 IPv4 route matching the subnet
198.18.0.0/24 is added.
Configure the traffic generator to send packets to the NIC port,
using the MAC and IP address displayed in the logs. In this example,
use a destination MAC address of 98:03:9B:71:24:2E and a destination
IP of 198.18.0.21. Then, dpdk-l3fwd will forward those packets out on port 0.
Stop
The pods can be stopped by deleting the deployment by running kubectl delete deploy dpdk on the DUT.
Then, clean up the Kubernetes cluster by executing sudo kubeadm reset -f and sudo rm -rf /etc/cni/net.d on the DUT.